You go to take a photo and your phone tells you there’s no room left. You try to update an app and it asks you to free up space first. Sound familiar? Almost every smartphone owner runs into this eventually, usually at the worst possible moment, and the annoying part is that most people have no idea what’s actually taking up all that room.
It’s rarely just photos. By the time most phones hit their storage ceiling, it’s a mix of forgotten apps, years of WhatsApp backups, duplicate screenshots, and cache files that quietly pile up in the background without ever showing up clearly in your settings menu. The good news is that fixing this doesn’t usually require buying a new phone or paying for cloud storage you don’t need. It just takes knowing where to actually look.
This guide walks through exactly that, for both Android and iPhone, starting with the biggest space hogs and working down to the smaller stuff that adds up over time.
Why Your Phone Fills Up Faster Than You Think
Before jumping into fixes, it helps to understand why this keeps happening even if you don’t take that many photos. A few things are working against you at once.
Camera quality has gone up dramatically over the last few years, and so has file size. A single 4K video clip from a recent flagship phone can easily run past 200MB per minute. Burst-mode photos, Live Photos on iPhone, and RAW image formats all multiply that further. Most people don’t realize their camera roll is the single biggest space drain until they actually check.
Apps have also gotten heavier. A game that used to be 200MB now ships with high-resolution textures and voice packs that push it past 2GB, and that’s before counting the save data and cache it generates while you play. Social apps like Instagram and TikTok are particularly sneaky here, since they cache every video you watch even briefly, and that cache rarely clears itself.
Then there’s the stuff nobody thinks about: chat app backups, downloaded podcast episodes sitting in an app you forgot you had, voice memos, and old system files that build up after every software update. None of this shows up as one big obvious folder. It’s scattered across a dozen places, which is exactly why it’s so hard to track down without a system.
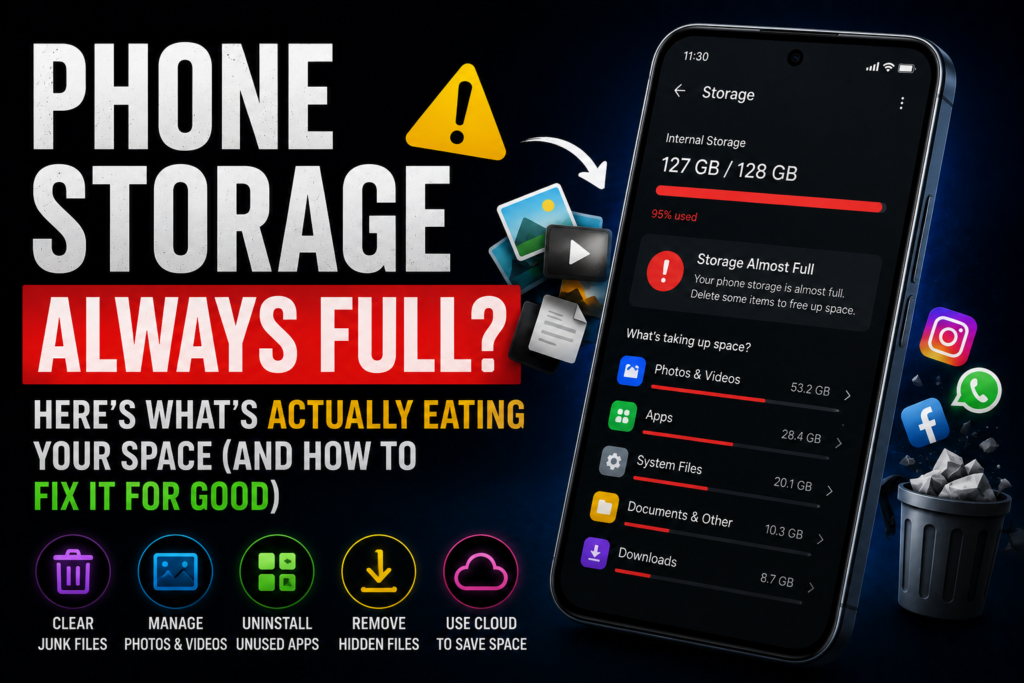
Step 1: Actually See What’s Using Your Space
Before deleting anything, find out where your storage is really going. Guessing wastes time and usually means deleting the wrong things first.
On iPhone:
Go to Settings, then General, then iPhone Storage. Give it a few seconds to load — Apple’s storage breakdown takes a moment to calculate everything. You’ll see a colored bar at the top showing categories like Apps, Photos, Media, and System Data, plus a list below ranking your apps by how much space they’re actually using, not just how big the app itself is.
On Android:
Go to Settings, then Storage (on Samsung phones it might be under Battery and Device Care). You’ll get a similar breakdown by category. Tap into any category for more detail, and check Settings, then Apps, then sort by size if you want to see exactly which apps are the worst offenders.
Pay attention to two things specifically: anything labeled “Other” or “System Data” that’s larger than 5-10GB, and any single app showing usage way higher than you’d expect. Both are usually signs of cache buildup rather than stuff you actually need.
Step 2: Deal With Photos and Videos First
This is almost always the biggest win, so start here.
Find and delete duplicates and near-duplicates. Burst photos are the worst culprit — you take ten shots trying to get one good one, then forget to delete the other nine. On iPhone, the Photos app has a built-in “Duplicates” album under Utilities that finds these automatically. On Android, Google Photos has a similar tool under the Library tab.
Check your screenshots folder. Most people take screenshots constantly for directions, memes, or things to remember, then never look at that folder again. It’s worth a five-minute scroll and a mass delete.
Turn on storage optimization for photos. This is the single most effective long-term fix for camera roll bloat. On iPhone, go to Settings, then Photos, then turn on “Optimize iPhone Storage” under iCloud Photos. This keeps small, compressed versions on your device while the full-resolution originals live in iCloud, and you can still access the originals anytime you’re connected to WiFi. On Android, Google Photos has the equivalent under your profile icon, then Photos settings, then Backup.
One thing worth knowing: storage optimization is not the same as deleting your photos. It just moves the heavy version off your device. If you’re trying to choose between cloud services for this, [LINK: iCloud vs Google Photos vs OneDrive] breaks down which one actually gives the best value for the free tier and paid plans.
Offload old videos manually if you’re not using cloud backup. If you’ve got months of old video clips you know you want to keep but never watch, move them to a laptop or external drive instead of leaving them on your phone. A single minute of 4K footage can be larger than a hundred regular photos combined.
Step 3: Clear App Cache the Right Way
Cache is temporary data apps store to load faster next time. It’s safe to clear and doesn’t delete your account, messages, or saved progress in most cases, but the data does come back over time, so this isn’t a permanent fix on its own — more like routine maintenance.
On Android, go to Settings, then Apps, tap an app, then Storage, then Clear Cache. Do this for your biggest apps first: Chrome, Instagram, TikTok, and any game you play regularly tend to be the worst offenders. Some Android phones also let you clear cache for all apps at once through a built-in cleaner tool — check under Storage settings for an option like “Free Up Space” or “Clean Now.”
On iPhone, Apple doesn’t give you a direct “clear cache” button for most apps, which catches a lot of people off guard. Instead, you typically have to offload and reinstall the app, which clears its cache while keeping your account logged in through iCloud or the app’s own login. You can do this from the same iPhone Storage screen mentioned earlier — tap an app and look for “Offload App.” For apps like WhatsApp specifically, going into the app’s own settings under Storage and Data usually gives you a built-in way to clear media cache without losing chat history.
Step 4: Find the Apps You Actually Forgot About
Open your full app list and actually scroll through it. Most phones accumulate a graveyard of apps downloaded once for a single use, a flight booking, a one-time event ticket, a game a friend recommended, and never opened again.
Both iPhone and Android will show you “last used” dates if you dig into the storage settings. Anything you haven’t opened in six months or more is a safe candidate for deletion. If it’s something you paid for, don’t worry, you won’t lose your purchase. Both app stores let you redownload anything tied to your account at no extra cost.
A quick tip for games specifically: many modern games separate the app itself from its downloaded content packs. Deleting the app sometimes leaves gigabytes of leftover data behind. Check the app’s individual storage page before and after deleting to make sure everything actually cleared.
Step 5: Check Chat Apps and Their Hidden Media Folders
WhatsApp, Telegram, and similar apps are notorious for this. Every photo, video, voice note, and GIF anyone sends you in any chat gets automatically saved to your phone’s storage by default, and most people never go in to manage it.
In WhatsApp, go to Settings, then Storage and Data, then Manage Storage. You’ll see a breakdown by chat, sorted by size, with the heaviest media-sharing chats at the top. Group chats with a lot of forwarded videos are almost always the biggest offenders. You can select and delete media in bulk from right inside this screen without leaving the conversation itself.
It’s worth doing this every couple of months rather than waiting until storage is critically low, since these folders grow quietly in the background with zero notification.
Step 6: Handle the “System Data” Mystery
If your storage breakdown shows a large chunk labeled “Other,” “System Data,” or “Documents and Data” that doesn’t match any specific app, this is usually temporary files, system logs, and caches that build up from regular use and software updates.
A simple restart can sometimes trigger the system to clean up some of this on its own. On iPhone, a more thorough trick that often works: try downloading a large app or game from the App Store, even one you don’t actually want, until the download fails due to insufficient space. This forces iOS to clear temporary files in the background to try to make room, which can free up a surprising amount of space. Just delete the partial download afterward.
On Android, restarting the phone and then checking Settings, then Storage again after a day of normal use often shows this category shrink somewhat on its own as the system cleans up old logs and temp files.
Step 7: When You’ve Done All This and Storage Is Still Full
If you’ve cleared cache, deleted unused apps, optimized your photos, and you’re still constantly hitting your limit, it might genuinely be a capacity problem rather than a clutter problem. This is common if you’re on an older 32GB or 64GB device and you take a lot of photos or video.
In that case, the real fix is either committing properly to a cloud storage plan so your phone only holds what you’re actively using, or considering more storage on your next upgrade. If you’re shopping around and trying to figure out how much storage actually makes sense for how you use your phone day to day, [LINK: 128GB vs 256GB vs 512GB Phone Storage] walks through realistic numbers based on actual usage patterns rather than just picking the biggest number available.
Read more 128GB vs 256GB vs 512GB Phone Storage — How Much Do You Actually Need?
A Simple Routine to Stop This From Happening Again
Once you’ve done the big cleanup, a small monthly habit keeps things from spiraling back to zero free space:
Once a month, clear cache on your three or four most-used apps. Once every couple of months, go through your camera roll and delete obvious duplicates and screenshots you don’t need anymore. Once every few months, scroll your full app list and uninstall anything you haven’t opened. And keep photo storage optimization turned on permanently rather than toggling it off and on.
None of this takes more than ten minutes total, and it’s a lot less frustrating than discovering you’re out of space right when you’re trying to capture something you don’t want to miss.
FAQ: Phone storage Full Phone Storage Always Full